Others
Others
Helpful but difficult to classify - examples that do not fit purely into one of the previous categories can be found here. They may be a mixture or e.g. cannot work without additional adaptations. Please find out for yourself.
Content:
The intention of this sample is to provide the basic structure of an application, which uses various of object types and displays to get familiar with the integrated access control in atvise.
Components:
Object Types -> machine
Object Types -> Engine
Object Types -> Pump
DISPLAYS -> USER -> Machine A
DISPLAYS -> USER -> Machine B
DISPLAYS -> SYSTEM -> Settings
DISPLAYS -> Main
Global Parameters -> onColor
Global Parameters -> offColor
OBJECTS -> Machine A
OBJECTS -> Machine B
atvise® version:
3.13
Content:
The intention of this sample is to provide the basic structure of an application, which uses various of object types an can be used to get familiar with the integrated version control in atvise.
Components:
ObjectTypes -> Conveyor_Belt
ObjectTypes -> Engine
ObjectTypes -> Pump
Library -> PROJECT -> Display Scripts -> AlarmIndication
Library -> PROJECT -> Display Scripts -> indication
OBJECTS -> Conveyor_Belt
OBJECTS -> Pump
OBJECTS -> Engine
atvise® version:
3.13
Content:
The intention of this sample is to provide the basic structure of an application, which uses object types, group alarms and displays. In this case the application will simulate a production line with multiple conveyor belts.
Components:
Object Types -> Conveyor_Belt
OBJECTS -> Conveyor_Belts -> BELT_001
OBJECTS -> Conveyor_Belts -> BELT_002
OBJECTS -> Conveyor_Belts -> BELT_003
OBJECTS -> Conveyor_Belts -> BELT_004
OBJECTS -> Conveyor_Belts -> BELT_005
DISPLAYS -> MAIN -> Conveyor_Belts
Alarming -> Groups -> Belt Alarm
Library -> PROJECT -> Display Scripts -> AlarmIndication
Library -> PROJECT -> Display Scripts -> indication
atvise® version:
3.13
Content:
call a sample REST service and put the response on a display
Hint:
For the example, use "set anonymous and NTLM users as project administrator" under the Access Control menu. This will make the atvise Live example work without setting any defined permission for it.
Imported Display:
Agent > Displays > System > RestDisplay
atvise® version:
3.13
Content:
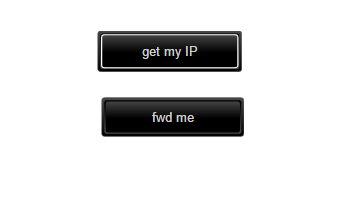
This example shows how to get local IP from clients and forward it to a specific display.
Hint:
For the example, use "set anonymous and NTLM users as project administrator" under the Access Control menu. This will make the atvise Live example work without setting any defined permission for it.
The following sample displays will be created:
- Displays > Main > Startpage
- Displays > Main > Local
- Displays > Main > Testmachine
- Displays > Main > undefined
The following webMI-Method-Scripts will be created:
- Library > Project > webMI Method Scripts > forward Client
- Library > Project > webMI Method Scripts > Get_IP
atvise® version:
3.13
Content:
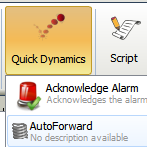
This library element contains a QuickDynamic that forwards directs to a display based on the client device - either desktop or mobile - when starting the visualization.
Target system:
webMI + SCADA
Add the QuickDynamic "AutoForward" to your Default display. When starting/reloading the visualization the client will be forwarded to the "Default_Mobile" or "Default_PC" display depending on the device used to access the HMI.
Hint:
For the example, use "set anonymous and NTLM users as project administrator" under the Access Control menu. This will make the atvise Live example work without setting any defined permission for it.
Included Nodes:
Name: Default_PC
Type: Display
Path: Servers > My Server > DISPLAYS
Name: Default_Mobile
Type: Display
Path: Servers > My Server > DISPLAYS
Name: AutoForward
Type: QuickDynamic
Path: Library > PROJECT > Quick Dynamics
atvise® version:
3.13
Content:
The getSessionUsers script logs all sessions to a string node, the SessionTable control displays a list of the logged sessions.
Target system:
SCADA
Every 10 seconds the getSessionUsers script browses through all
sessions and adds them to session_user_string:
ip1|user1,ip2|user2,
SessionTable shows all Sessions.
Hint:
For the example, use "set anonymous and NTLM users as project administrator" under the Access Control menu. This will make the atvise Live example work without setting any defined permission for it.
Included Nodes:
Name: getSessionUsers
Type: Script
Path: Servers > My Server > OBJECTS
Name: session_user_string
Type: Node (String)
Path: Servers > My Server > OBJECTS
Name: SessionTable
Type: Display
Path: Library > PROJECT > Object Displays
atvise® version:
3.13
Content:
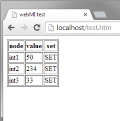
The intention of this sample is to show how to integrate webMI into any HTML page. In this case the sample contains a HTML Page with a table where you can set the values of the sample nodes int1, int2, int3.
Call up the 'test.htm' in your browser by entering the address e.g. "http://localhost/test.htm" and click on 'SET' in the table. Now a alert box appears, you can set the new value of the node.
Target system:
webMI + SCADA
Hint:
For the example, use "set anonymous and NTLM users as project administrator" under the Access Control menu. This will make the atvise Live example work without setting any defined permission for it.
Included Nodes:
Name: test.htm
Type: HTML-File
Path: Library > PROJECT > Resources
Name: int1
Type: Node (Int32)
Path: Servers > My Server > OBJECTS
Name: int2
Type: Node (Int32)
Path: Servers > My Server > OBJECTS
Name: int3
Type: Node (Int32)
Path: Servers > My Server > OBJECTS
atvise® version:
3.13