Scripting
Scripting
Move the limits - with scripts you can create & customize atvise features. The samples here give you some insight, what can be done with scripting. Feel free to download and adapt these atvise live samples and please go ahead and upload your own scripts to atvise live if you have content you would like to share.
Content:
This atvise live component contains a CSV Import, that can be used to import a CSV file in a defined format to create Instances of Object Types, Variable Types or simply assign historical archives, templates and smoothing properties. The script itself include at the beginning a description of all columns of the CSV file and an example, which can be copied in a new created CSV file to test the functionality.
Script:
Object Type & Variable Type:
Aggregate Template:
History Archives > Aggregate Templates > MyTemplate
atvise® version:
3.13
Content:
This atvise live component contains a library of server-side scripts for the creation of elements in the atvise project. This allows nodes, archives, alarms, data sources or mirroring properties to be created automatically via script. The example uses the OPC UA test server (which is part of the atvise installation) for this purpose.
Library:
PROJECT -> Script Library -> Library -> alarm
PROJECT -> Script Library -> Library -> helper
PROJECT -> Script Library -> Library -> history
PROJECT -> Script Library -> Library -> mirror
PROJECT -> Script Library -> Library -> objects
PROJECT -> Menu Script -> Example
Object Types:
EngineType
atvise® version:
3.13
Content:
Create "MirrorOnDemand" by Script for all mirrored nodes that have "mirrorInput" or "MirrorInputoutput".
"With "MirrorOnDemand" a variable with a "MirrorInput" or "MirrorInputOutput" will only be updated with values from the data source when the variable is subscribed from a currently opened display in a browser. If the variable is not subscribed at least once, the value will not be updated and the status of the variable is set to UncertainLastUsableValue."
Hint:
For the example, use "set anonymous and NTLM users as project administrator" under the Access Control menu. This will make the atvise Live example work without setting any defined permission for it.
Imported Resources:
- Library > Project > Menu Scripts > MirrorOnDemandAll
to trigger the script:
- navigate to Library > Project > Menu Scripts,
- open the script "MirrorOnDemandAll"
- press the "play" button
atvise® version:
3.13
Content:
Create a data archive by Script with entered name in dialog box.
Hint:
For the example, use "set anonymous and NTLM users as project administrator" under the Access Control menu. This will make the atvise Live example work without setting any defined permission for it.
Imported Resources
- Library > PROJECT > Menu Scripts > CreateArchive
to trigger the script:
- navigate to Library -> PROJECT -> Menu Scripts,
- open the script "CreateArchive"
- press the "play" button
- Enter the history name in the dialog box value
atvise® version:
3.13
Content:
Create a OPC UA data source by script with all its properties
Hint:
For the example, use "set anonymous and NTLM users as project administrator" under the Access Control menu. This will make the atvise Live example work without setting any defined permission for it.
Imported Resources:
- Library > Project > Menu Scripts > CreateDatasource
atvise® version:
3.13
Content:
This example browses the remote datasource and logs node addresses with properties.
There are two ways how this script can be used: via the context menu direct in the engineering tool or via another script.
In the first case the script can be triggered via a rightclick on the datasource in the project tree, followed by "Node Action" -> "PROJECT" -> BrowseRemoteDatasource.
(By using this way, there is no need for specifying a datasource-name)
If the script is called by an other script, the datasource-name can be specified.
In any case the startAdress needs to be provided.
Hint:
For the example, use "set anonymous and NTLM users as project administrator" under the Access Control menu. This will make the atvise Live example work without setting any defined permission for it.
Imported Resources:
Library > Project > Menu Scripts > BrowseRemoteDatasource
atvise® version:
3.13
Content:
Searches for mirror properties of nodes
Hint:
For the example, use "set anonymous and NTLM users as project administrator" under the Access Control menu. This will make the atvise Live example work without setting any defined permission for it.
The following Menu-Scripts will be created:
- Library > Project > Menu Scripts > SearchMirrorProperties
atvise® version:
3.13
Content:
Menu script that searches for historical references of nodes.
Hint:
For the example, use "set anonymous and NTLM users as project administrator" under the Access Control menu. This will make the atvise Live example work without setting any defined permission for it.
The following Menu-Scripts will be created:
- Library > Project > Menu Scripts > GetHistoricalReferences
atvise® version:
3.13
Content:
Rename a Display with MenuScript
Hint:
For the example, use "set anonymous and NTLM users as project administrator" under the Access Control menu. This will make the atvise Live example work without setting any defined permission for it.
The following Menu-Scripts will be created:
- Library > Project > Menu Scripts > Rename
atvise® version:
3.13
Content:
DataGenerator as Server Script
Hint:
For the example, use "set anonymous and NTLM users as project administrator" under the Access Control menu. This will make the atvise Live example work without setting any defined permission for it.
The following Server Scripts will be created:
- Library > Project > Scripts Library > DataGenerator
atvise® version:
3.13
Content:
This example shows how to perform a database operation via odbc.
Hint:
For the example, use "set anonymous and NTLM users as project administrator" under the Access Control menu. This will make the atvise Live example work without setting any defined permission for it.
The following Menu-Scripts will be created:
- Library > Project > Menu Scripts > odbc
atvise® version:
3.13
Content:
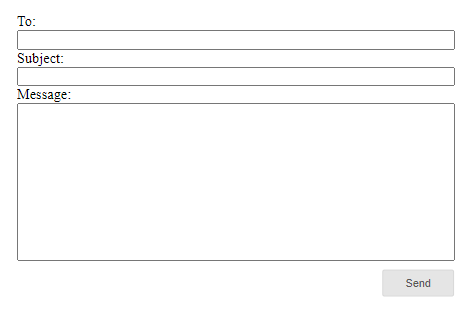
An example to show how to send an email from the client (visualization) via the webMIMethodScript.
Target system:
SCADA
To use this example you have to set up a smtp server in your project. (For more information search the atvise documentation for "SMTP Settings")
Drag&drop the ObjectDisplay "SEND_MAIL" to a display and set the following parameters: SMTP Server (name), From (sender email address), To (recipient email address), Subject, Message.
Click the button to send the Message.
For log messages see the atserver_std.log file in your project directory.
Hint:
For the example, use "set anonymous and NTLM users as project administrator" under the Access Control menu. This will make the atvise Live example work without setting any defined permission for it.
Included Nodes:
Name: SEND_MAIL
Type: webMI MethodScript
Path: Library > PROJECT > webMI Method Scripts
Name: SEND_MAIL
Type: Dispaly
Path: Library > PROJECT > Object Displays
atvise® version:
3.13
Content:
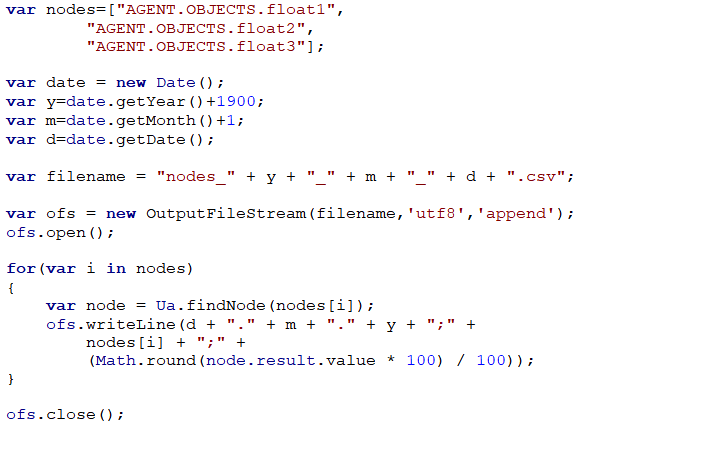
A script to log three example nodes to a CSV file in a custom set interval.
Target system:
SCADA
Demonstrates how to write node values into a CSV file triggered by an interval that can be set in the script parameters (-> open the script > set parameter value in the table on the top). The CSV file can be found in the atvise installation directory.
Hint:
For the example, use "set anonymous and NTLM users as project administrator" under the Access Control menu. This will make the atvise Live example work without setting any defined permission for it.
Included Nodes:
AGENT > OBJECTS > float1
AGENT > OBJECTS > float2
AGENT > OBJECTS > float3
Server Scripts:
Library > Project > Script Library > WRITE_CSV
atvise® version:
3.13